Phone
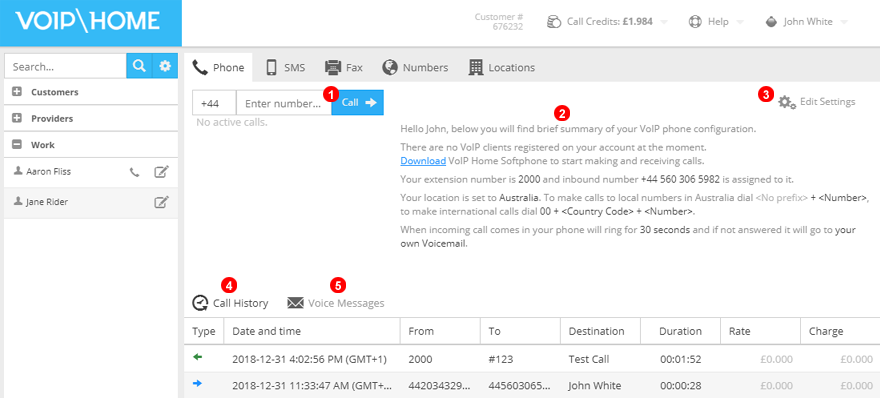
Figure 8.1 Users panel.
From this panel you can:
1. Perform a web call
2. View any inbound number(s) assigned to, and SIP endpoint currently registered with, your account.
3. Edit your account settings as described below with the Edit Settings button.
4. Review and download your Call History
5. Get access to your Voice Messages
Settings
Below you will find a detailed description of all the options available when editing your user settings.
General and Numbers
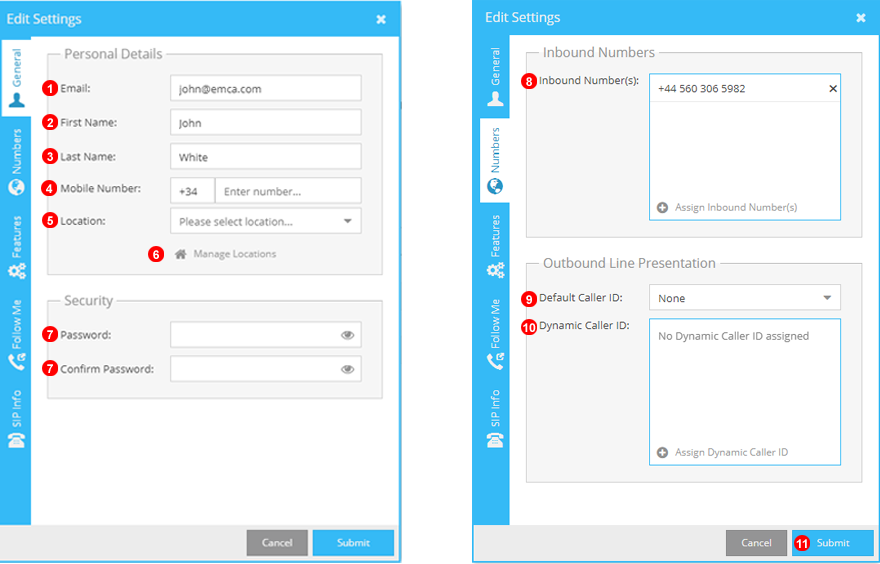
Figure 8.2 General and Numbers panel.
- Enter the email address of user. This is to be used for logging in, username and access to voicemail.
- Enter user first name.
- Enter user last name.
- Enter an optional mobile number to be used on the contacts page.
- Select the user location. This changes display settings to a more localised format and the outgoing dialplan.
- Access management of all Account Locations.
- Create and confirm the password used to log into the user account.
- Assign numbers to users. NOTE: Numbers assigned to a user will direct calls to specified user only.
- Select Default CLI/Caller ID that will be displayed for all outgoing calls that do not fit dynamic caller ID criteria.
- Select ALL numbers to be used for caller ID. NOTE: Dynamic CLI will only apply to countries that match the Inbound numbers assigned.
- Click to submit and create a new user or make changes to edited users.
Features and Groups
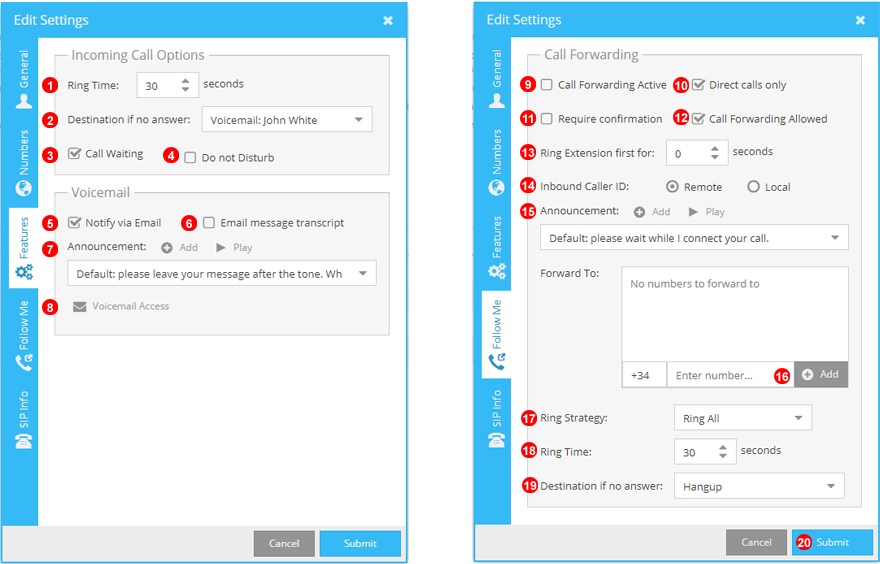
Figure 8.3 Features and follow me panel.
- Select the time interval before incoming calls go to the "No Answer" option.
- When a call times out, select the destination that the call will be sent to. For example - send call to voicemail, IVR etc.
- Allow call waiting - allows multiple incoming calls to be accepted on a single extension. Disable this to limit simultaneous incoming calls to one.
- Enable or disable 'Do Not Disturb' for user.
- Select the delivery options for voicemail.
- Enable voicemail text message transcripts.
- From here you can select your voicemail announcement. You can update or add a new voicemail announcement. NOTE: Announcement Audio files must be in MP3 format and no larger than 2MB.
- Display the methods available to access your voicemail remotely. You can also create 4 digit PIN to gain remote access.
- Activate call forwarding. To enable & disable this function directly from the IP phone or softphone please dial:
#421Enable Call Forwarding#422Disable Call Forwarding
- Select an option to allow forwarding to happen on all calls or direct calls only (calls placed directly to a user extension or inbound number). If you select 'Follow Me' this will not activate on calls from ring groups, queues etc.
- Confirm acceptance of forwarded call by pressing 1 on the dialpad. This helps to prevent calls forwarded to mobile numbers being answered by a voicemail service.
- Deselect to prevent the user from activating the 'Follow Me' feature on their extension.
- Set the time to ring the SIP Phone before call forwarding starts.
- Select caller ID display mode: Remote party will display caller ID as normal, local party will display the number the caller dialled in on.
- Select a pre-forward message, disable pre-forward message or upload your own.
- Enter the number that calls should be forwarded to.
- If multiple numbers are being forwarded to, 'Ring Strategy' can be used to route calls between numbers.
- Select timeframe before the "Destination if no answer" option comes into effect.
- Select option to execute when call is not answered.
- Click to Submit and Create a new user or submit changes to edited user.
SIP Info
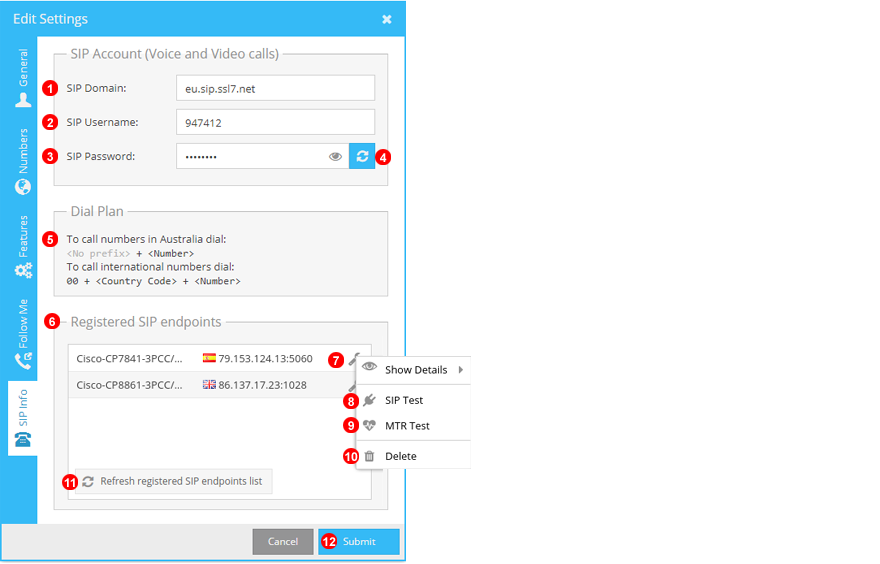
Figure 8.4 SIP Info panel.
- Domain used by the account to connect Phones.
- Username used for authentication of Phones.
- Password required for authentication of Phones.
- Reset SIP password - note: all configured SIP devices will have to be re-provisioned when SIP password is reset.
- Dialplan of user when making outgoing calls - dependent on the location selected for user.
- Displays all registered SIP endpoints for user. User cannot make or receive calls if no endpoints are registered.
- Use wrench icon to access SIP tools context menu.
- 'SIP Test' allows to verify connectivity of VoIP Home network.
- 'MTR Test' allows to verify connection quality of VoIP Home network.
- Use this option to force remove SIP registration.
- To refresh the list with newly registered SIP devices.
- Submit changes to edited user.