Phone - Softphone
The softphone application enables you to make and answer calls. It needs to be installed and running on every computer, which you want to use for VoIP calls.
Download
The softphone application can be downloaded from:
- The download page of our website at https://voiphome.com/download/
- The home page of our website at https://voiphome.com
Install
Windows
To install the softphone application on Microsoft Windows follow the steps below:
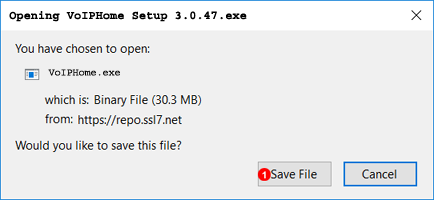
- Click the 'Download' link and save the file.
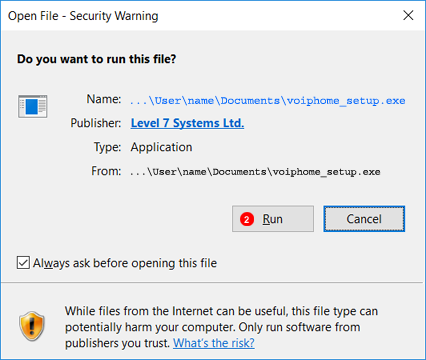
- Locate and double click VoIP Home-ver.exe icon to start the set up program.
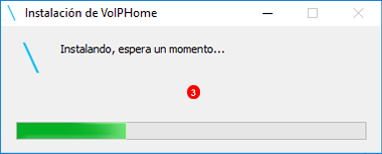
- Wait for installation to complete.
Mac OS
To install the softphone application on a Mac follow the steps below:
- Download the VoIP Home-ver.dmg package and open it.
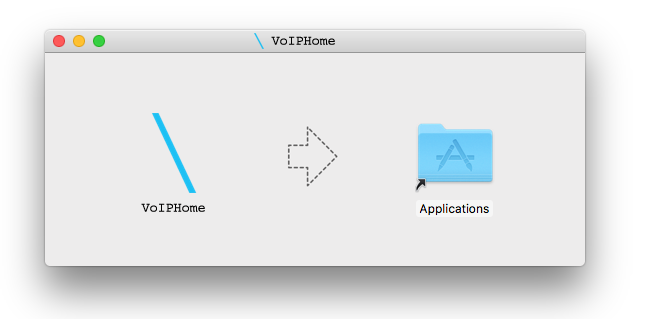
- Drag and drop the VoIP Home icon into Applications folder.
Linux
deb
Follow the instructions below to install the softphone on Linux distribution using deb packages (Debian, Ubuntu, Mint etc.):
- Install the GPG key:
wget -O - http://repo.ssl7.net/repo/key | sudo apt-key add - - Add repository:
echo "deb http://repo.ssl7.net/repo/voipstudio/stable/main/binary /" | sudo tee /etc/apt/sources.list.d/voipstudio.list - Update and install:
sudo apt-get update & sudo apt-get install voipstudio
Login
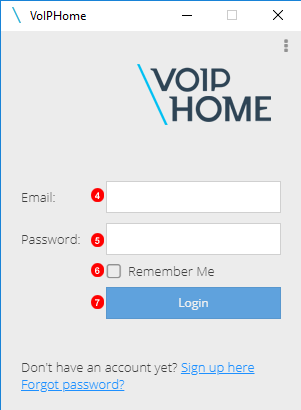
To start making VoIP calls you need to login into the softphone application with your email and password (the same you use for web control panel). Enter your email address into field (1) and password into field (2). Click the 'Login' button (3) and verify that there is a green icon  in your taskbar which indicates that the application is running correctly - see Figure 9.6 below.
![]()
Call Transfer
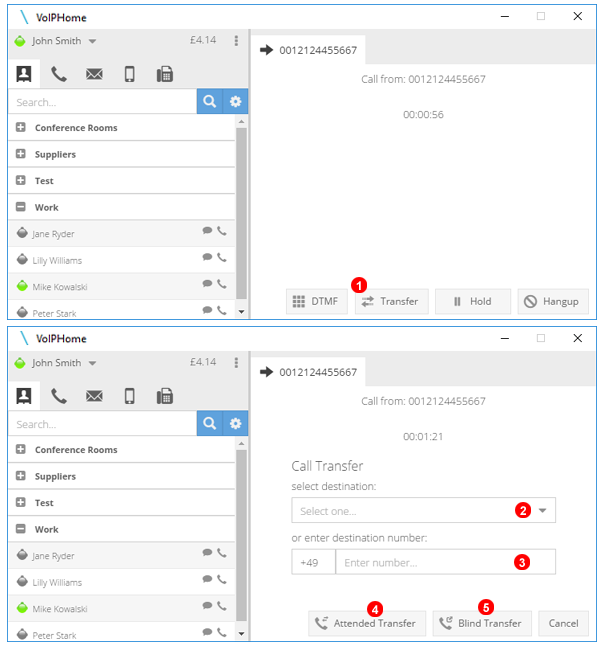
In order to transfer a call to another user or external number:
- Click the
Transferbutton located in the bottom part of the active call panel. - Select the transfer destination from your contacts list.
- Alternatively, enter the transfer destination number manually. This way you can transfer the call to any external number.
- Click
Attended Transferto put the active call on hold and place a call to the transfer destination. Once the transfer destination answers, click theTransferbutton again to complete the transfer. - Alternatively click
Blind Transferto make an instant call transfer without calling the destination number first.
Settings
General
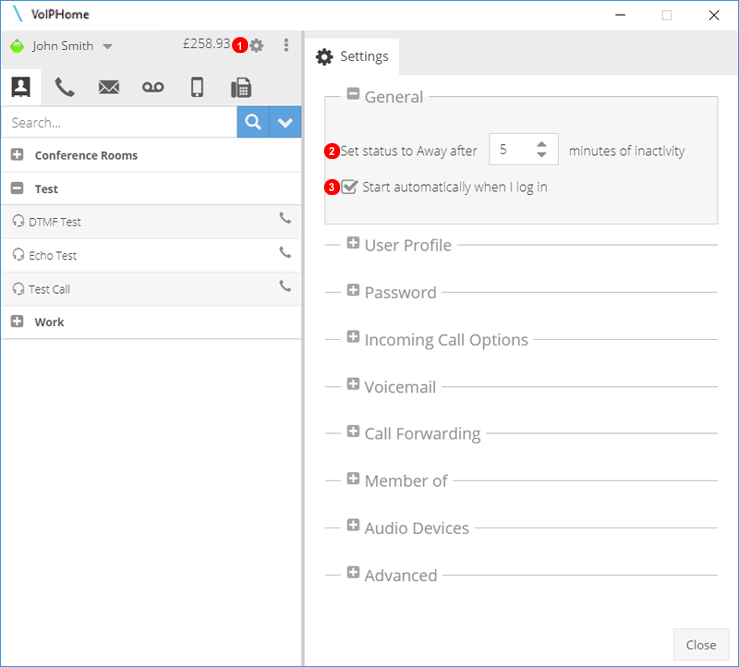
- Click the gear icon to open settings.
- Change the number of minutes before the softphone changes to away status due to inactivity.
- Select to enable/disable the automatic start of the softphone when the device starts up.
User Profile
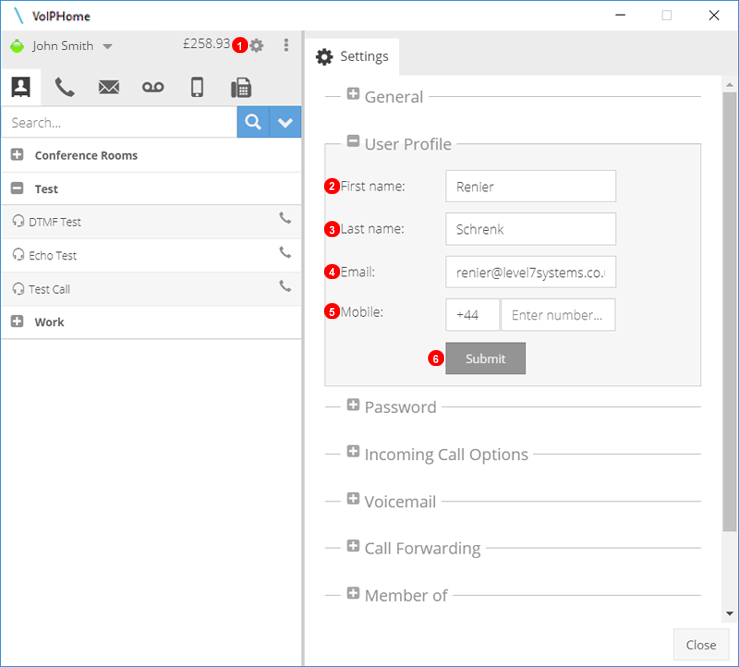
- Click the gear icon to open settings.
- Edit the first name or identifier of user.
- Edit the last name or second identifier of user.
- Edit the login and voicemail email address of user.
- Edit or enter the user's mobile number.
- Click 'Submit' to complete and save any changes.
Password
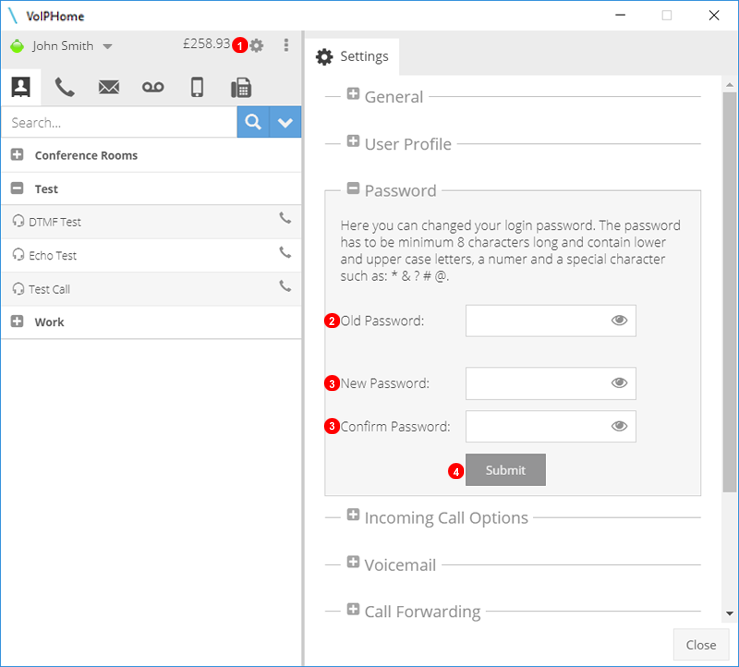
- Click the gear icon to open settings.
- Enter the current password for authentication.
- Enter and confirm the new password.
- Click 'Submit' to complete and save any changes.
Incoming Call Options
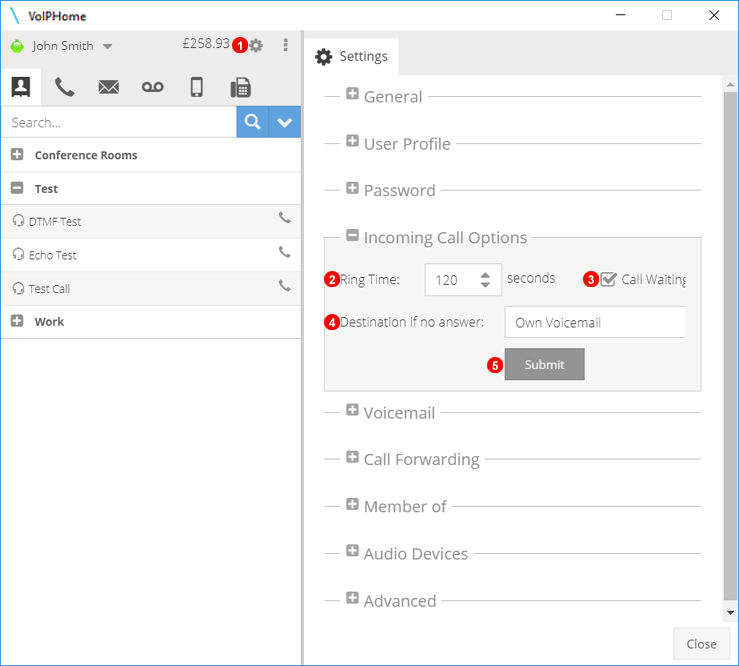
- Click the gear icon to open settings.
- Select the time before an incoming call is transferred to a destination if it is unanswered.
- Enable or disable call waiting.
- Select the action when an incoming call is not answered.
- Click 'Submit' to complete and save any changes.
Voicemail
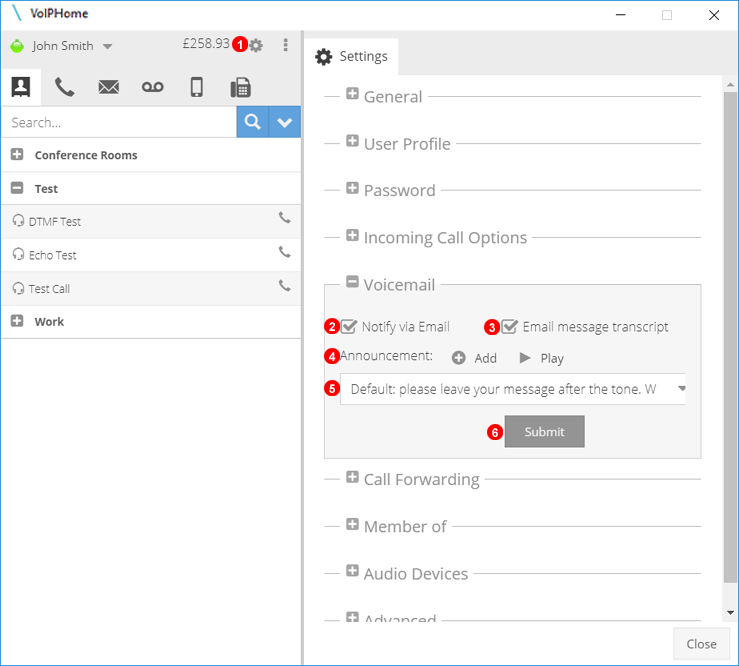
- Click the gear icon to open settings.
- Select to enable email notification with an audio file attachment of voicemail message.
- Select to enable transcription of voicemail message to text.
- Click 'Add' to upload a new voicemail greeting message and 'Play' to listen to the current greeting.
- If multiple files are uploaded, the active message can be selected from the dropdown list.
- Click 'Submit' to complete and save any changes.
Call Forwarding
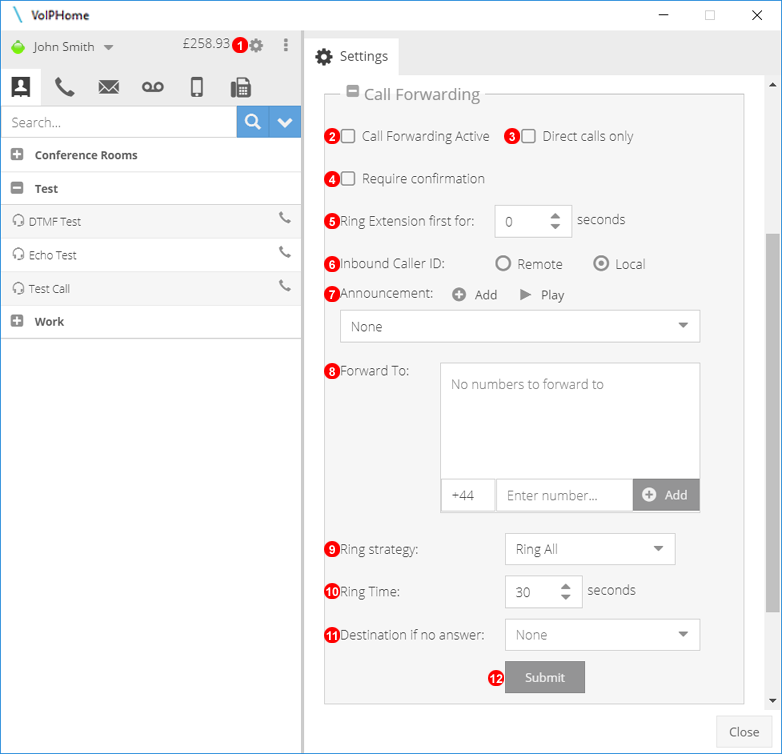
- Click gear icon to open settings.
- Click to enable call forwarding.
- Click to enable forwarding for direct calls only. If disabled, calls from ring groups and queue's will be forwarded too.
- Enable the use of # as the confirmation of forwarded calls on the receiving device.
- If a VoIP Phone is online, a specified time can be set to ring the VoIP device first before call forwarding starts.
- Select remote(callers) or local(VoIP) number to be displayed as caller ID on the receiving device.
- Add, Play or Upload Message played to caller before call is forwarded.
- Enter and add number(s) to forward calls to.
- If multiple numbers are available for forwarding, a ring strategy can be used to manage call distribution.
- Select how long a forwarded call will ring before going to 'No Answer'.
- Select an action to be taken if a call is not answered.
- Click 'Submit' to complete and save any changes.
Member of
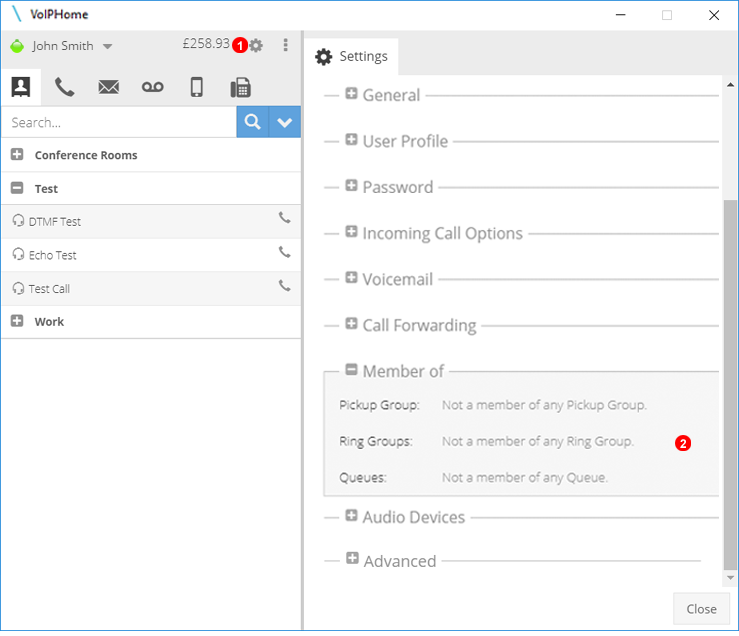
- Click Gear Icon to Open Settings.
- As VoIP Home is meant for individual users, extensions can not be member of any queue or group.
Audio Devices
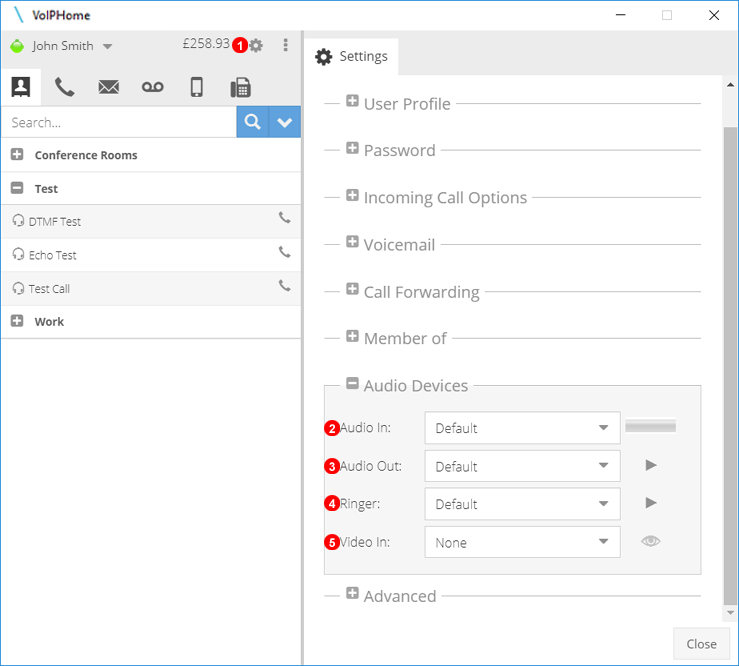
- Click gear icon to open settings.
- Change microphone settings.
- Change call audio settings.
- Select ringer device.
- Select webcam or other video device.
Advanced
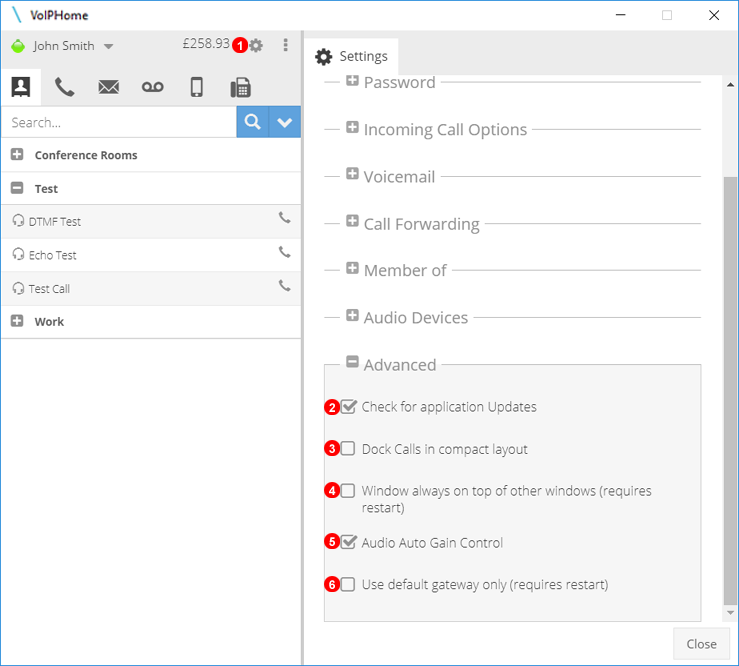
- Click gear icon to open settings.
- Enable automatic update checks.
- Enable compact view of active calls.
- Call and softphone window will always be at the front of other windows or applications.
- Enable volume levels to be controlled automatically.
- Enable the application to use default gateway settings only.
Troubleshooting
Below is a listing of commonly asked questions and answers and basic troubleshooting steps for the softphone application.
Invalid email / password
"Wrong email/password entered" message displayed when I try to login.
Make sure that the email address and password is the same you use to login into the control panel at https://voiphome.com/login/. If you forgot your password, go to https://voiphome.com/recover-password/ and we will send a new password to your email address.
Firewall
"Firewall error" message displayed when I try to make calls.
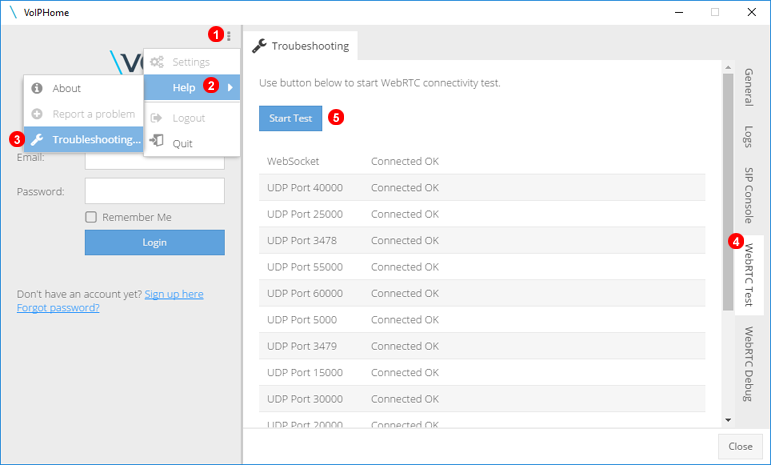
Some ISPs (Internet Service Providers) block UDP ports which are required for our softphone application to work. To check if your computer can successfully connect to our network:
- Click main menu icon.
- Select
Helpfrom the contact menu. - Select
Troubleshooting...from theHelpsub-menu. - Click
WebRTC Testtab. - Click
Start Testbutton.
After few moments you will see a list of ports being tested. If any shows connection and Failed you will need to inspect your firewall / router configuration and/or contact your Internet Service Provider to have the ports unblocked.
Reporting a problem
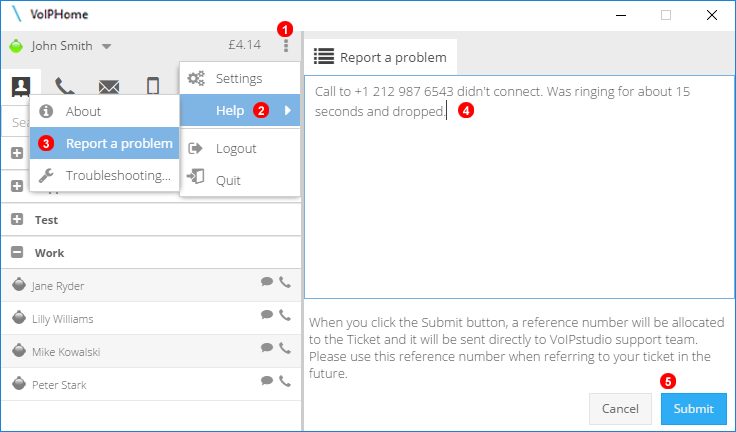
To report a problem with a softphone application or calls made / received:
- Click the main menu icon.
- Select
Helpfrom the contact menu. - Select
Report a problemfrom theHelpsub-menu. - Enter the details of the issue. If a problem relates to a particular phone call make sure to include the date and time of the calls and number dialled (for outbound calls) or caller ID for inbound calls.
- Click the
Submitbutton to open a support ticket.