Phone - Third party softphones
Below you will find instructions how to configure popular free SIP softphones with the VoIP Home service. Before you begin you will need to obtain your SIP account details:
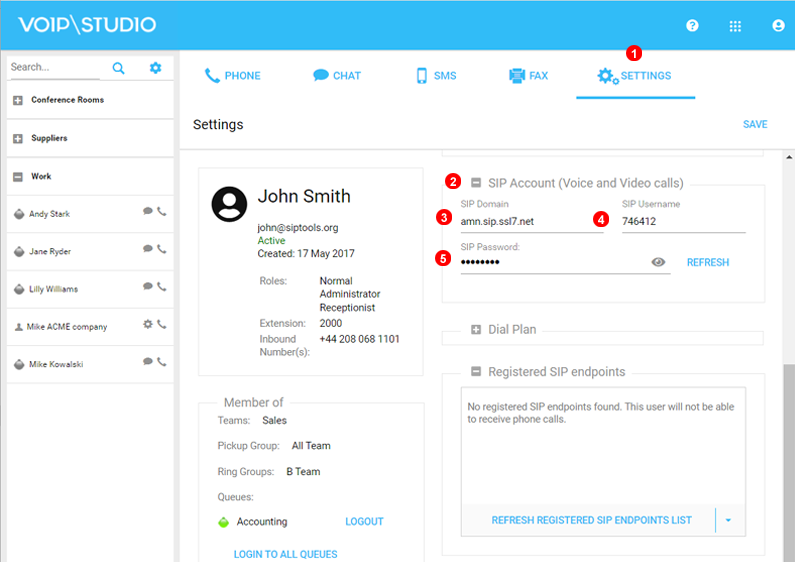
- Click the gear icon
 in the top right part of the
 My Accountpanel - Select
SIP Infofrom the list on the left.
Use SIP username, password and domain (3,4,5 in the Figure 11.1 above) to configure the SIP softphone or a hardware device.
Ekiga
In order to set up Ekiga with VoIP Home download the installation package from http://ekiga.org/ website (or use your distribution packages manager), obtain your VoIP Home SIP account details as shown in Figure 11.1 above and follow the instructions below:
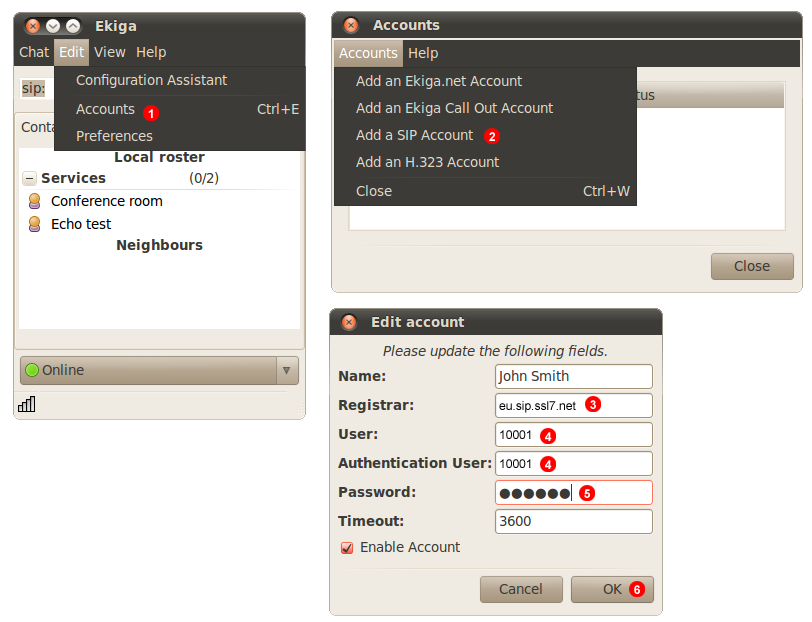
- Go to
EditandAccounts. - Select
Add a SIP Accountfrom the menu. - Enter your SIP domain into field
(3). - Enter your SIP username into fields
(4). - Enter your SIP password into field
(5). - Click the
OKbutton.
After a short while Ekiga will connect to our servers and you will be able to start making and receiving calls.
Android Native Softphone
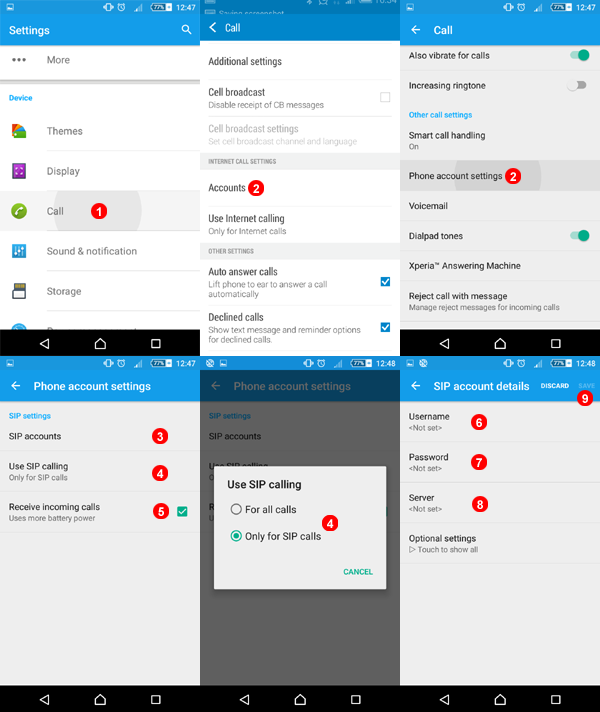
- Go to Settings, scroll down and select Call.
- Scroll down and select Phone Account Settings.
Set up will vary depending on the version of Android you have. To check your version go to settings -> General -> About.
The above 2 Images were from Version 5.0 on the left and Version 5.1.1 on the Right.
- Select SIP Accounts to add account details.
- Select 4 to select outgoing call preference.
- Select to accept inbound calls.
- Enter your SIP username into field
(6). - Enter your SIP password into field
(7). - Enter your SIP domain into field
(8). - Click save to register account.
Telephone
In order to set up a telephone with VoIP Home , download the installation package from http://www.tlphn.com/ website (or MacApp Store), obtain your VoIP Home SIP account details as shown in Figure 11.1 above and follow the instructions below:
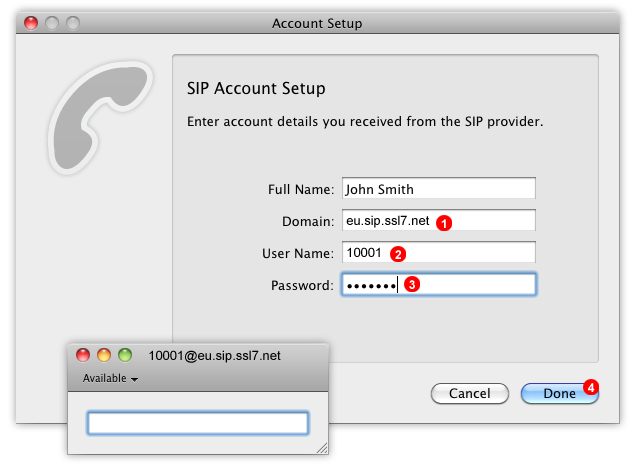
- Start Telephone and enter your SIP domain into field
(1). - Enter your SIP username into field
(2). - Enter your SIP password into field
(3). - Click the
Donebutton
After a short while your Telephone will connect to our servers and you will be able to start making and receiving calls.
Twinkle
In order to set up Twinkle with VoIP Home , download the installation package from http://twinkle.dolezel.info/ website (or use your distribution packages manager), obtain your VoIP Home SIP account details as shown in Figure 11.1 above and follow the instructions below:
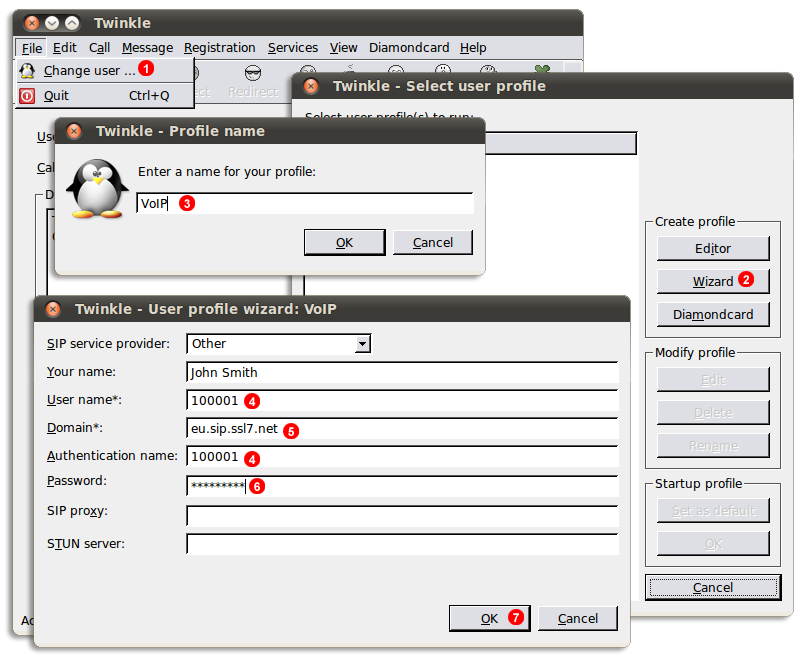
- Go to
FileandChange user... - Click
Wizardbutton. - Enter VoIP Home as your account name and click
OK. - Enter your SIP username into fields
(4). - Enter your SIP domain into field
(5). - Enter your SIP password into field
(6). - Click
OKbutton.
After a short while Twinkle will connect to our servers and you will be able to start making and receiving calls.
X-Lite 3
In order to set up X-Lite 3 with VoIP Home , download installation package from http://www.counterpath.com website, obtain your VoIP Home SIP account details as shown in Figure 11.1 above and follow the instructions below:
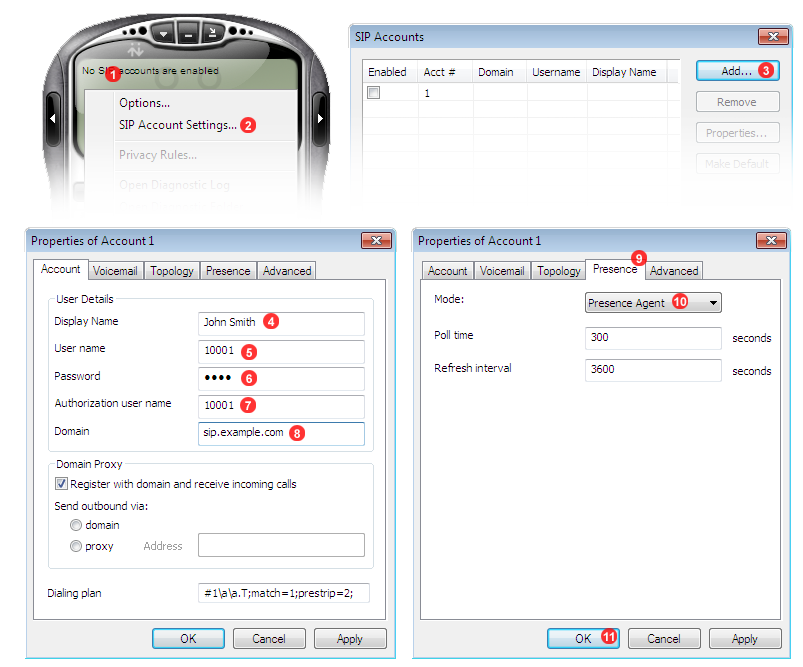
- Right click on X-Lite screen.
- Select
SIP Account Settings...option(2)from context menu. - Click
Add...button(3)in SIP Accounts window. - Enter your name into field
(4). - Enter your SIP Username from
SIP Infopanel - Enter your SIP Password into field
(6). - Enter your SIP Username into field
(7). - Enter SIP domain into field
(8). - Switch to
Presencetab(9). - Select
Presence Agentfrom drop down list(10). - Click
OKbutton.
After a short while, X-Lite will connect to our servers and you will be able to start making and receiving calls.
X-Lite 4
In order to set up X-Lite 4 with VoIP Home , download installation package from http://www.counterpath.com website, obtain your VoIP Home SIP account details as shown in Figure 11.1 above and follow the instructions below:
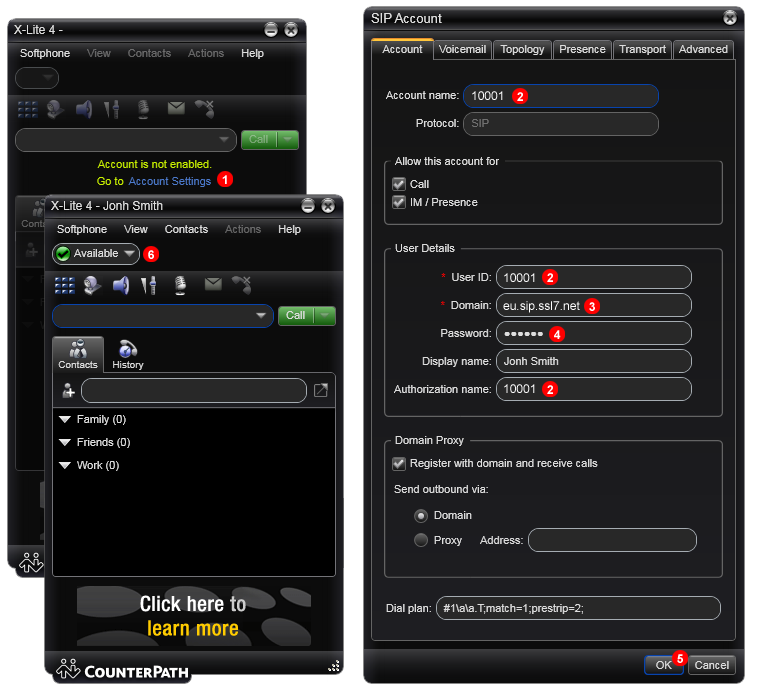
- Click
Account Settingsin main X-Lite window. - Enter your SIP username into field
(2). - Enter your SIP domain into field
(3). - Enter your SIP password into field
(4). - Click
OKbutton.
After a short while X-Lite will connect to our servers and you will be able to start making and receiving calls.
3CX Phone
In order to set up 3CX Phone with VoIP Home , download installation package from http://www.3cx.com/3CXPhone/ website, obtain your VoIP Home SIP account details as shown in Figure 11.1 above and follow the instructions below:
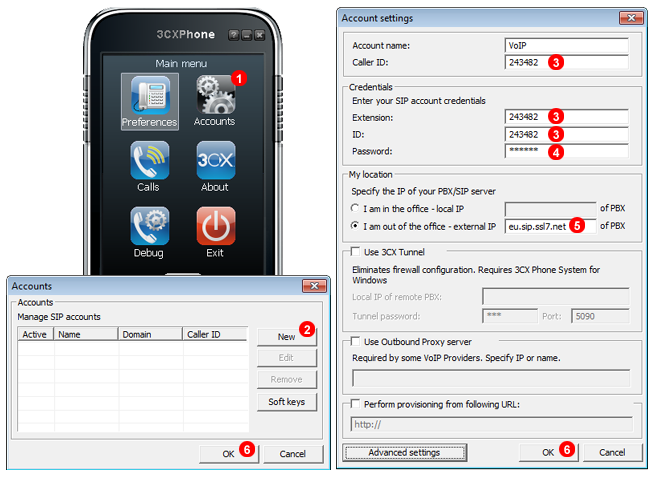
- Right click the main window and select
Accountsfrom the menu. - Click
Newbutton inAccountswindow. - Enter your SIP username into fields
(3). - Enter your SIP password into field
(4). - Select
I am out of the office - external IPand enter your SIP domain into filed(5). - Click
OKbuttons.
After a short while 3CX Phone will connect to our servers and you will be able to start making and receiving calls.
ZoIPer
In order to set up ZoIPer with VoIP Home , download installation package from http://www.zoiper.com/ website, obtain your VoIP Home SIP account details as shown in Figure 11.1 above and follow the instructions below:
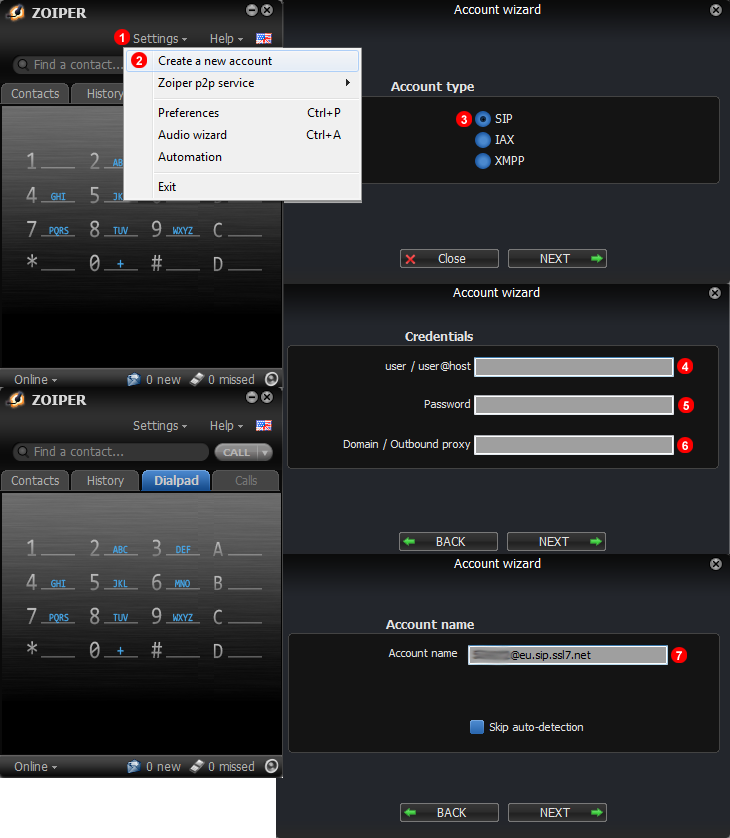
- Select Settings.
- Select Create New Account.
- Select SIP if not selected by Default.
- Enter your SIP username into fields
(4). - Enter your SIP password into filed
(5). - Enter your SIP domain into field
(6). - ZoIPer will automatically fill in your username@domain.net click next and your account will be completed automatically.
After a short while ZoIPer will connect to our servers and you will be able to start making and receiving calls.
Note: under some devices you may experience call disconnection after few seconds. To sort this issue you may need to set up VoIPstudio STUN server under your ZoIPer app. Yous should be able to find this setting under Settings > Accounts > Select your account > Network Settings. Enable use of STUN and set our custom STUN server "stun.ssl7.net"
ZoIPer iPhone
In order to set up ZoIPer with VoIP Home , download installation package from https://itunes.apple.com/gb/app/zoiper-sip-softphone-for-voip/id438949960?mt=8 website, obtain your VoIP Home SIP account details as shown in Figure 11.1 above and follow the instructions below:
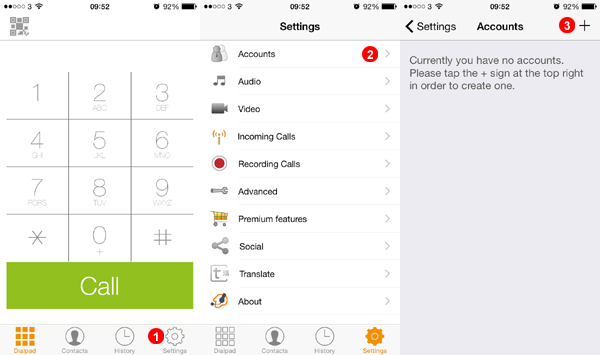
- Select Settings.
- Select Accounts.
- Tap the Plus Sign to start setup.
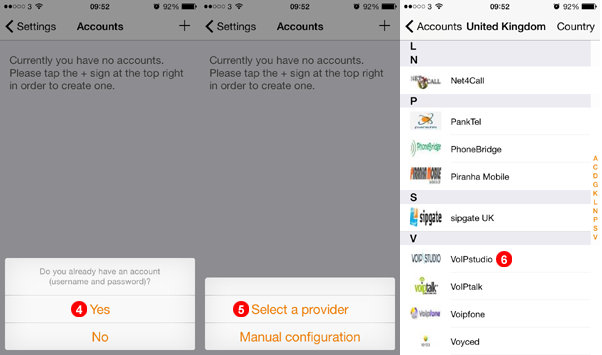
- Select Yes.
- Choose Select a Provider.
- Scroll down and Select VoIP Studio.
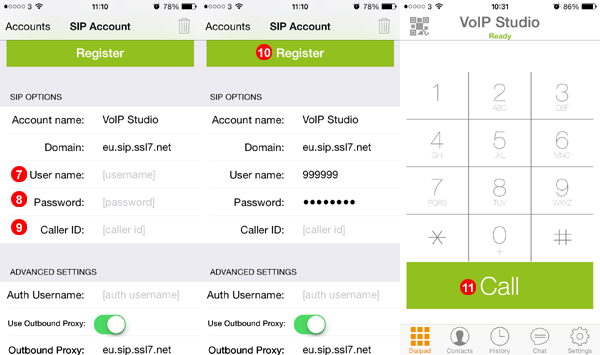
- Fill SIP Username into field
(7). - Fill SIP Password into field
(8). - Enter Identifier of Choice into field
(9). - Tap Register to register with our servers.
- After Registration is complete enter any number and tap the call button.
After a short while ZoIPer will connect to our servers and you will be able to start making and receiving calls.
ZoIPer Android
In order to set up ZoIPer Android with VoIP Home, download installation package from https://play.google.com/store/apps/details?id=com.zoiper.android.app&hl=en_GB and follow instruction below:
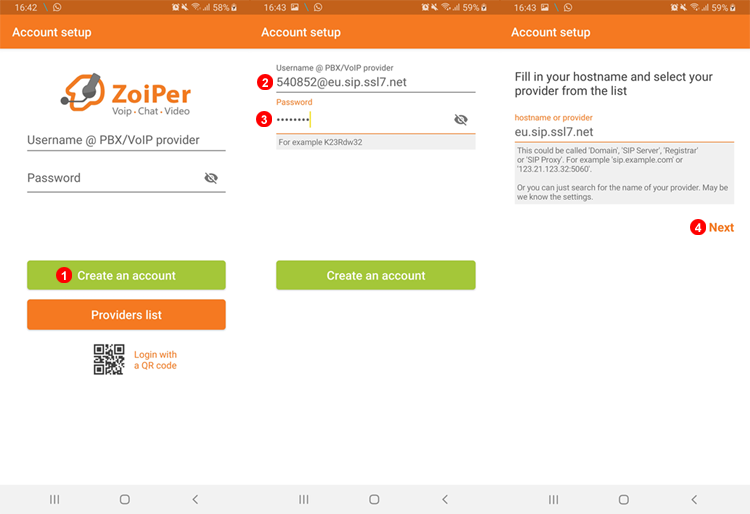
- Select Create an Account.
- Enter SIP Username@domain in this example "540852@eu.sip.ssl7.net"
- Enter SIP Password.
- Click Next without making any changes.

- Select Skip without making any changes.
- Wait for Tests to complete then select UDP regardless of Test results.
- Account should go green if succesfully registered.
Dial #123 to make a test call.
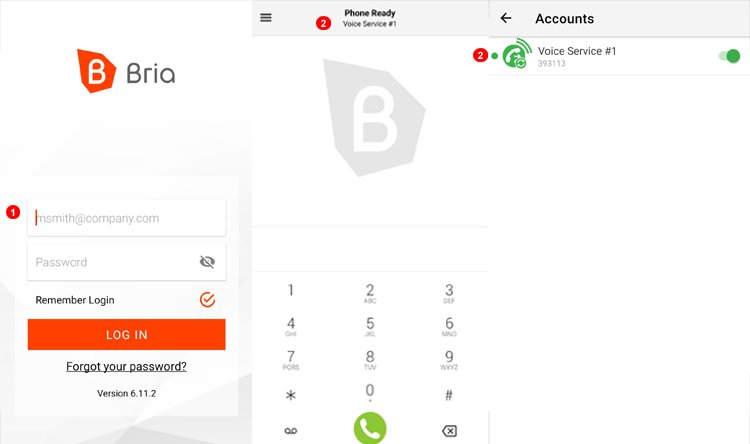
Bria Android
In order to set up Bria Android with VoIP Home , download installation package from https://play.google.com/store/apps/details?id=com.bria.voip and follow the instructions below:
Auto Configuration

- Select Settings
- Select Accounts
- Add account using "+" sign
- Scroll down to find VoIP Studio Select either EU or AMN.
- Input Any Account name.
- Input Name that will display on account main screen.
- Input SIP Username.
- Input SIP Password.
- Press the Back Button and then go to dialpad and start calling.
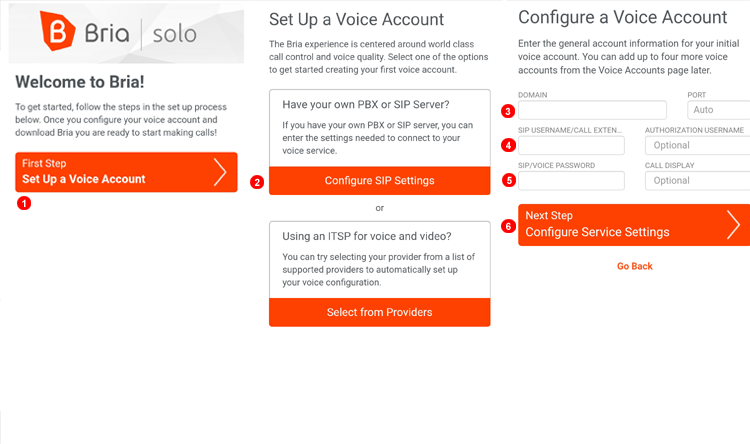
Manual Configuration
- Select Settings
- Select Accounts
- Add account using "+" sign
- Scroll down to find VoIPStudio Select either EU or AMN.
- Input any account name.
- Input name that will display on account main screen.
- Input SIP username.
- Input SIP password.
- Input SIP domain (Either eu.sip.ssl7.net or amn.sip.ssl7.net)
- Input voicemail number #445
- Press the 'Back' button and then go to dialpad and start calling.
Bria iPhone
In order to set up Bria iPhone with VoIP Home ,download installation package from http://itunes.apple.com/app/bria-iphone-edition/id373968636 and follow the instructions below:
Auto Configuration
- Select
Accountsmenu. - Tap plus button to add account.
- Scroll Down and Select either VoIP Studio EU or VoIP Studio AMN.(Check SIP Info under edit user check if domain is eu.sip.ssl7.net or amn.sip.ssl7.net)
- Enter Display Name.(This can be identifier of choice)
- Enter your SIP Username into fields
(5). - Enter your SIP Password into field
(6). - Icon will Flash Green/Red while registering and stay green when registered successfully.
- Enter number you wish to call and tap
Callbutton(8).
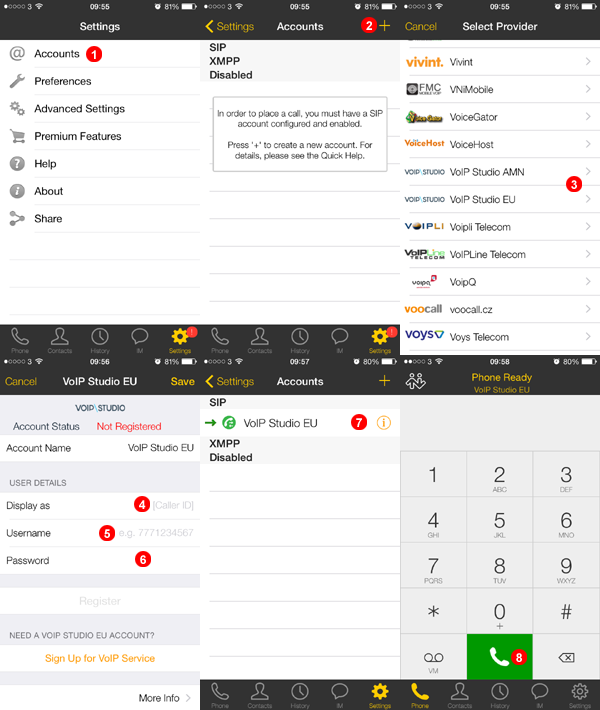
Manual Configuration
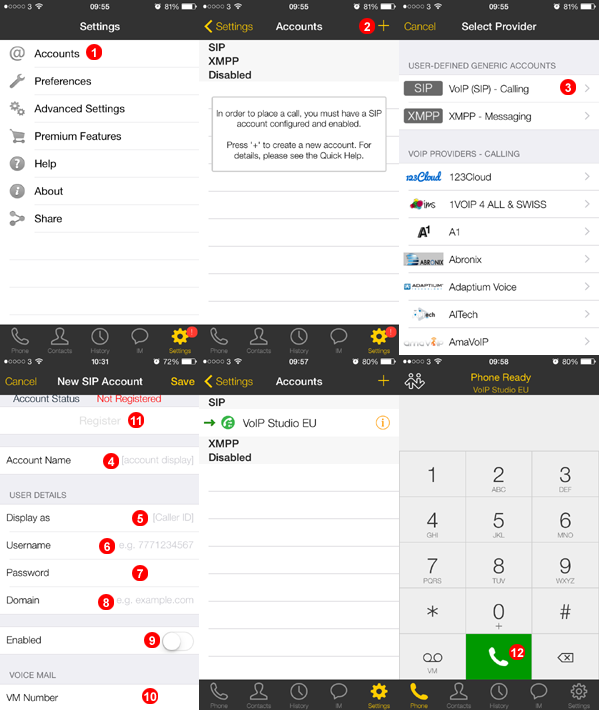
- Select
Accountsmenu. - Tap plus button to add account.
- Select
SIP - Making Callsfrom the menu. - Enter VoIP Home as
Account Name. - Enter Display Name.(This can be identifier of choice)
- Enter your SIP Username into fields
(6). - Enter your SIP Password into field
(7). - Enter SIP domain into field
(8). - Change Selector to Green.
- Enter 445 into field
(10). - Tap
Registerbutton. - Enter number you wish to call and tap
Callbutton(12).
Bria iPad
In order to set up Bria iPad with VoIP Home, download installation package from http://itunes.apple.com/app/bria-ipad-edition-mobile-voip/id440744818 and follow the instructions below:
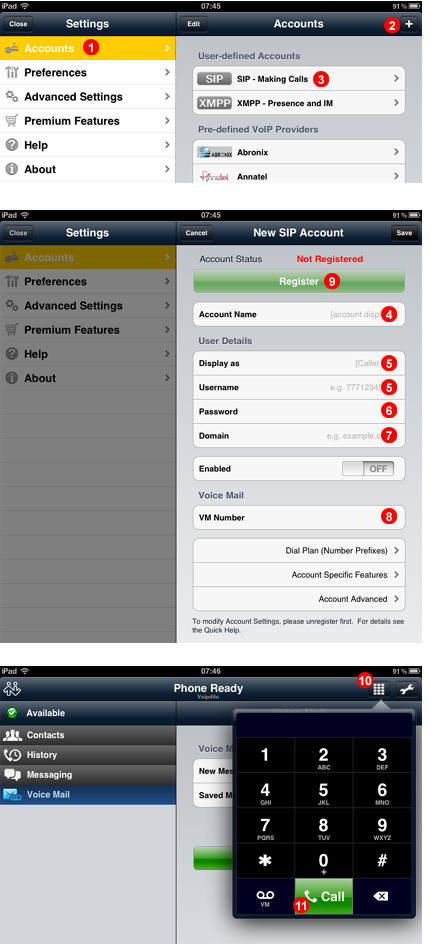
- Select
Accountsmenu. - Tap plus button to add account.
- Select
SIP - Making Callsfrom the menu. - Enter VoIP Home as
Account Name. - Enter your SIP Username into fields
(5). - Enter your SIP Password into field
(6). - Enter SIP domain into field
(7). - Enter 445 into field
(8). - Tap
Registerbutton. - Tap
Dialpadicon in top right corner. - Enter the number you wish to call and tap
Callbutton.
Grandstream Wave Lite for iPhone and Android
- IMPORTANT NOTE - only Grandstream Wave Lite is compatible with our service
In order to set up Grandstream Wave Lite with VoIP Home, please download installation package from Apple Store or Android Store and follow the instructions below:
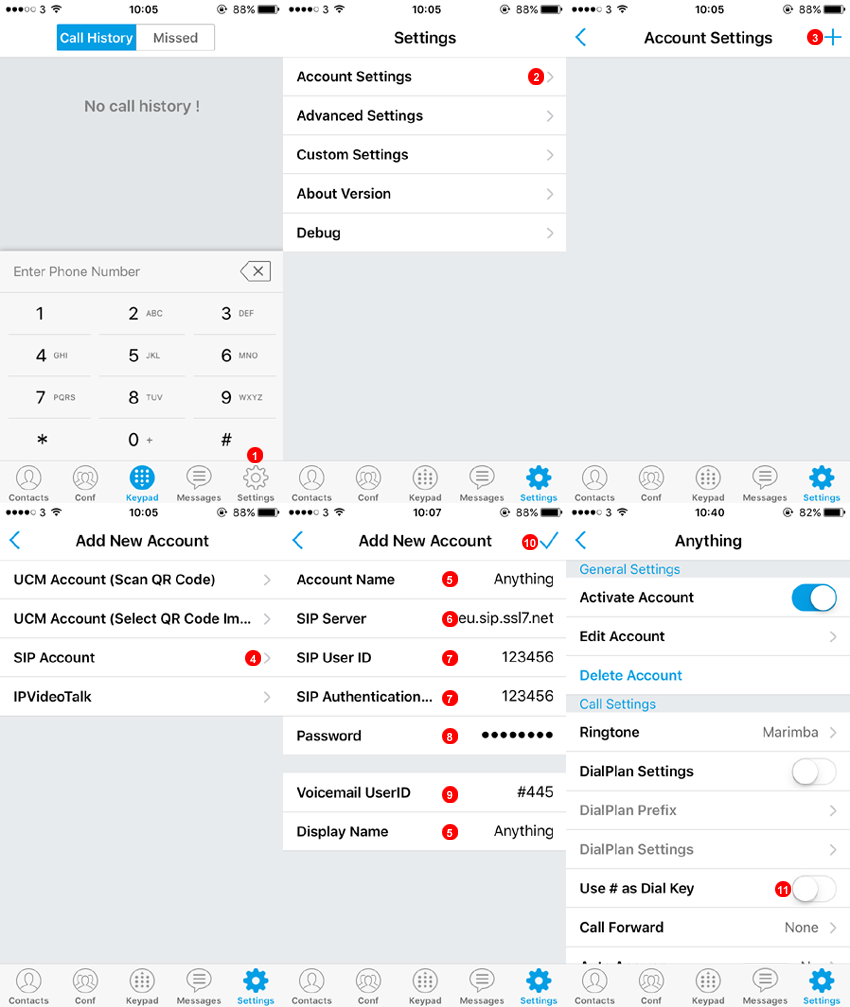
- To Start select
settings. - Select Account Settings.
- Select
+to add new account. - Select SIP account.
- Enter Any Descriptive Title.
- Enter Domain Provided on VoIP Home control Panel.
- Enter 6 Digit SIP User name provided on VoIP Home control Panel.
- Enter Password Generated on VoIP Home control Panel.
- Enter
#445to easily access voice mail. - Select
✓to complete configuration and register the account. - Go Back to settings and select the newly created account then remove
Use # as Dial Key